Plate 015 — Wargames
REF: BF-GME-015BattleFleet 1939 Game Manual: Rules, Units and Combat
BattleFleet 1939 was a turn-based World War II naval strategy game built around the classic Battleship concept, adding ship and aircraft movement, radar detection and a production economy. This reference reproduces its manual: unit values, movement, combat resolution and victory conditions.
BattleFleet 1939 was a turn-based World War II naval strategy game, its title referencing the year the war began in Europe, built as an extension of the classic Battleship concept. Where the classic game only lets players guess at a fixed grid, BattleFleet 1939 lets every ship, submarine and aircraft move each turn, and units can only detect and fire on enemies inside their own radar or sonar range. The result sits between the simplicity of Battleship and the depth of a full naval simulation: the player does not need a background in naval tactics to start a mission, but the game still rewards fleet positioning and target selection.
Two changes mattered most against the classic Battleship game:
- Ships and aircraft could move between turns rather than sitting on a fixed grid position.
- A unit had a radar range and could only find and fire on an enemy inside that range, rather than anywhere on the board, mirroring how a real warship has to locate a target before it can engage it.
A further set of smaller differences distinguished it from the classic game:
- Battle maps could run up to 96x96 fields.
- The player could choose among 27 ship types, 4 submarine types, 5 airplane types and 3 port artillery types.
- Maps contained land and islands as well as both minor and major ports.
- Missions carried a variety of objectives rather than a single win condition.
- Missions ran under a turn limit.
- The player could purchase new ships and aircraft mid-mission, funded by points earned in combat.
Mission Objectives and Victory
Each mission carried one or two objectives, drawn from a fixed set:
- Conquer all enemy major ports.
- Defend friendly ports for a set number of turns.
- Destroy a set number of enemy ships of a given class (for example, four enemy heavy cruisers).
- Eliminate as many enemy combat or transport ships as possible within a turn limit.
- Secure a transport convoy of a set size to a friendly port.
Death-match scenarios used a single objective — destroy every enemy ship, aircraft and artillery piece. In a campaign, the player had to reach at least a minor victory in every mission of that campaign to continue to the next one.
| Mission type | Victory condition |
|---|---|
| Conquer | All enemy major ports under the player's control |
| Defend | All of the player's major ports still held at the end of the last turn |
| Destroy N enemy X-class ships | The required number of enemy ships of the named class destroyed by the end of the last turn |
| Eliminate all enemy units | Every enemy combat/transport ship, submarine, aircraft and port artillery piece destroyed within the turn limit |
| Secure transport | The named number of transport ships delivered to the friendly port by the end of the last turn |
| Death-match | All enemy ships, aircraft and artillery destroyed by the end of the last turn |
| Free Hunt | Same as death-match, but only Minor Victory or Victory are possible — Major Victory is disabled |
Units and Their Values
| Category | Types | Remark |
|---|---|---|
| Combat ships |
| The AntiSub Carrier cannot attack planes |
| Non-combat ships |
| Cannot open fire and carry no radar range; auxiliary ships can repair other ship types |
| Submarines |
| Invisible to units without sonar |
| Airplanes |
| Static; every plane returns to its base at the end of the turn in which it flew; AntiSub Naval cannot attack planes |
| Port artillery |
| Static |
Every unit falls into one of five categories: combat ships, non-combat ships, submarines, airplanes and port artillery. Combat ships ranged from small torpedo and patrol boats up to fleet carriers and fleet battleships; non-combat ships (transporters and auxiliary ships) could not open fire and carried no radar range, though auxiliary ships could repair other vessels. Submarines stayed invisible to any unit without sonar. Airplanes were static units that returned to base at the end of every turn, and anti-submarine naval aircraft could not attack other aircraft. Port artillery was likewise static and defended its own port field.
Each unit — ship, aircraft or port artillery piece — carried five attributes: MOVE (how many fields it can travel per turn), RANGE (radar and sonar detection range), FIRE (number of fire points, i.e. hits, per turn), ARMOR (hit points before destruction) and DAMAGE MARKS (a record of what type of attack last hit the unit — aircraft, surface ship, submarine or port artillery). The full list of units, with their in-game two-letter mark and base values, is reproduced below; unit types marked with an asterisk were only available in the registered version of the game.
| Unit type | Mark | Fire | Armor | Speed | Range | Sonar | Price (PP) |
|---|---|---|---|---|---|---|---|
| Light Transporter | TL | 0 | 3 | 3 | 0 | No | — |
| Transporter | TR | 0 | 4 | 2 | 0 | No | — |
| Heavy Transporter | TH | 0 | 5 | 2 | 0 | No | — |
| Light Submarine * | SL | 2 | 3 | 3 | 1 | No | 50 |
| Submarine | SU | 3 | 4 | 2 | 1 | No | 55 |
| Heavy Submarine | SH | 3 | 5 | 2 | 1 | No | 60 |
| Fleet Submarine * | SF | 3 | 6 | 2 | 1 | No | 65 |
| Patrol Boat * | PB | 1 | 2 | 2 | 0 | No | 25 |
| Torpedo Boat * | TB | 2 | 3 | 3 | 0 | No | 25 |
| Frigate | FR | 2 | 3 | 2 | 0 | Yes | 35 |
| Corvette | CO | 2 | 4 | 2 | 0 | Yes | 40 |
| Light Destroyer | DL | 2 | 4 | 4 | 1 | Yes | 45 |
| Destroyer | DE | 2 | 5 | 3 | 1 | Yes | 50 |
| Heavy Destroyer * | DH | 3 | 6 | 3 | 1 | Yes | 55 |
| Fleet Destroyer * | DF | 3 | 5 | 4 | 1 | Yes | — |
| Escort Cruiser * | CE | 2 | 5 | 2 | 2 | No | 55 |
| Anti-Submarine Cruiser * | CA | 2 | 6 | 3 | 2 | Yes | 65 |
| Heavy Anti-Sub Cruiser * | CS | 3 | 6 | 3 | 2 | Yes | — |
| Light Cruiser | CL | 2 | 6 | 4 | 2 | No | 75 |
| Cruiser | CR | 3 | 7 | 3 | 2 | No | 80 |
| Heavy Cruiser | CH | 4 | 8 | 3 | 2 | No | 90 |
| Fleet Cruiser * | CF | 5 | 7 | 4 | 2 | No | — |
| Battlecruiser * | BC | 3 | 8 | 4 | 3 | No | 105 |
| Battleship | BB | 4 | 10 | 3 | 3 | No | 105 |
| Heavy Battleship * | BH | 5 | 10 | 3 | 3 | No | 120 |
| Fleet Battleship * | BF | 5 | 9 | 4 | 3 | No | — |
| Escort Aircraft Carrier * | AE | 2 | 5 | 2 | 4 | No | 95 |
| Anti-Submarine Air Carrier * | AA | 2 | 6 | 3 | 4 | Yes | 110 |
| Light Aircraft Carrier | AL | 2 | 6 | 4 | 4 | No | 130 |
| Fast Aircraft Carrier * | AV | 2 | — | 5 | 4 | No | — |
| Aircraft Carrier | AC | 3 | 8 | 3 | 4 | No | 140 |
| Heavy Aircraft Carrier | AH | 4 | 8 | 3 | 4 | No | 150 |
| Fleet Aircraft Carrier * | AF | 5 | 7 | 3 | 4 | No | 165 |
| Fighter | FT | 2 | 5 | 5 | 1 | No | 74 |
| Long Range Fighter * | FL | 2 | 5 | 7 | 1 | No | — |
| Anti-Submarine Naval * | NA | 2 | 5 | 5 | 1 | Yes | 80 |
| Naval | NV | 2 | 6 | 5 | 1 | No | 85 |
| Long Range Naval * | NL | 2 | 6 | 7 | 1 | No | — |
| Bomber | BO | 3 | 8 | 6 | 2 | No | 95 |
| Heavy Bomber * | BH | 4 | — | 7 | 2 | No | — |
| Strategic Bomber * | BS | 4 | 8 | 6 | 3 | No | 105 |
| Light Coast Artillery | ArtL | 2 | 2 | 0 | 1 | No | — |
| Coast Artillery | Art | 3 | 3 | 0 | 1 | No | — |
| Heavy Coast Artillery | ArtH | 3 | 4 | 0 | 2 | No | — |
| Light Auxiliary Ship | XL | 0 | 4 | 3 | 0 | No | 70 |
| Auxiliary Ship * | XS | 0 | 6 | 3 | 0 | No | 90 |
| Heavy Auxiliary Ship * | XH | 0 | 8 | 3 | 0 | No | 110 |
Movement
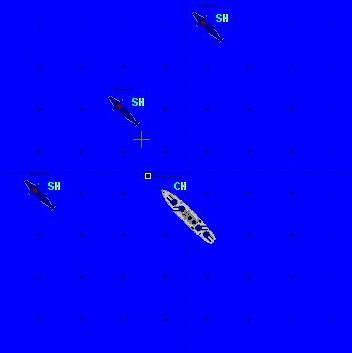
An object could not move further in one turn than its speed (MOVE) attribute allowed. Selecting a ship or aircraft gave it focus, shown as a blinking blue square; the player could then move it with a right-click to any field marked with a black dot, meaning it was reachable within the unit's remaining move points.
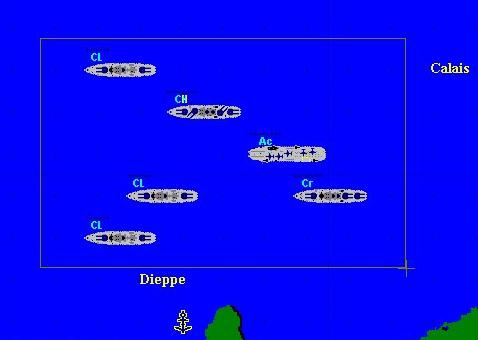
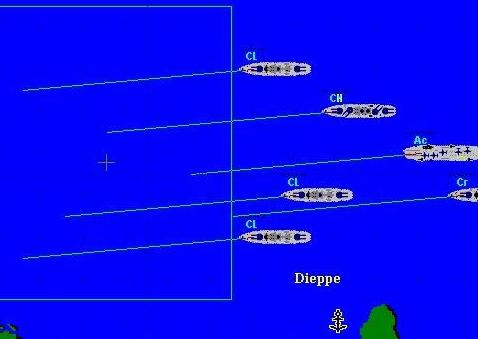
The game also supported group moves: holding the left mouse button and dragging a rectangle around several ships selected all of them at once (each shown with a blue square), and a single right-click on a destination sent the whole group there. There were no move-point markers for a group move — instead, each selected ship advanced toward the destination according to its own speed attribute. A Light Aircraft Carrier with a speed of 4, for example, moved only 4 fields toward a destination 10 fields away, even though the rest of the group might be faster or slower.
Detection: Radar and Sonar Range
After a unit moved, it switched on its radar or sonar, lighting the surrounding fields in light blue (sonar used a different shade of blue). Any enemy unit inside that range became visible and could be targeted. Once a player finished a turn, every enemy unit that had been discovered — with the exception of aircraft and port artillery, whose positions cannot change — turned invisible again, and the light-blue detection fields disappeared until the next move phase.
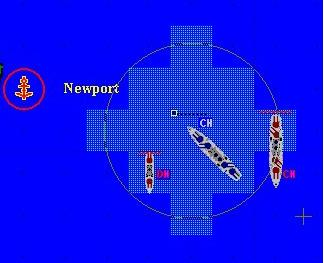
Detection carried three restrictions. Only aircraft-carrier types (AF, AH, AC, AL, AA) and airplane types (BS, BO, NV, FT) could discover enemy aircraft sitting on land or island fields. Only ships and aircraft equipped with sonar (CA, DH, DE, DL, FR, CO, NA) could detect enemy submarines. And submarines themselves could not detect port artillery sited on land or island fields, since their sonar does not read the shore.
Combat Resolution
A ship or aircraft could open fire on any visible enemy object after moving, provided that object stood inside its radar or sonar range; the order was given with a right-click on the target. The number of shots fired per turn was fixed by the unit's FIRE attribute — a Heavy Destroyer (DH) with a fire value of 2, for instance, could fire twice per turn against a valid target. Each hit reduced the target's ARMOR by one point; when armor reached zero, the object was destroyed. Three restrictions applied throughout: submarines could not fire on enemy port artillery; ships and aircraft without sonar could not fire on visible enemy submarines; and only aircraft carriers and airplane types (other than AA and NA) could fire on enemy aircraft sitting on the ground.
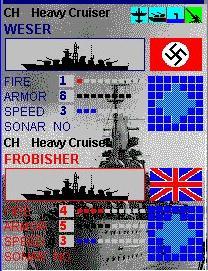
ARMOR represented an object's remaining strength, shown as a blue or red label above the unit; it fell with every hit taken and the object was destroyed once it reached zero. DAMAGE MARKS recorded what had caused the most recent damage — a plane icon for air attack, a ship icon for surface gunfire, a periscope icon for a submarine attack, or an artillery icon for port artillery fire.

Repair
Auxiliary ships (XH, XS, XL) could repair other ship types, though not aircraft. A ship could be repaired if it had not yet moved that turn, stood next to an auxiliary ship or inside a friendly-controlled port, and had taken damage. Pressing the REPAIR button restored 1, 2 or 3 armor points depending on the auxiliary ship type — 3 for a Heavy Auxiliary Ship, 2 for an Auxiliary Ship, 2 for a Light Auxiliary Ship — up to the ship's original, undamaged armor value. A Destroyer at 4 of its 5 base armor points, for example, could only be repaired for the single point it was missing. Repairing in a friendly-controlled port (without an auxiliary ship present) restored 2 armor points. A repaired ship could not move, activate radar or open fire until the start of the following turn, and an auxiliary ship could not repair itself, though two auxiliary ships could repair each other.
Air Units
Airplanes were static units: once placed at a base, they did not relocate on the map the way ships did, and every plane returned to its base automatically at the end of the turn in which it flew. Anti-submarine naval aircraft (NA) could not attack other aircraft. Detecting enemy planes sitting on land or island airfields required an aircraft-carrier-type unit or one of the airplane types listed above — ordinary surface ships could not see them. Once discovered, an enemy plane on the ground stayed visible turn to turn, since its position could not change, unlike a ship or submarine that vanished again once the turn ended.
Submarines
Submarines were invisible to any unit that lacked sonar, which made them the one unit type that ordinary surface ships (without a sonar-equipped mark) could not detect or engage at all. Detecting a submarine required a ship or aircraft carrying sonar — CA, DH, DE, DL, FR, CO or NA. Submarines could not fire on enemy port artillery, and they could not detect artillery sited on land or islands either, since sonar does not read targets ashore. Some missions carried a "storm ocean" restriction that removed the option to purchase submarines for the duration of that mission.
The Game Turn
Each game turn consisted of a move phase and a fire phase for every unit in play. After a unit moved, its radar or sonar switched on and lit the surrounding fields; any enemy object inside that light-blue area became visible, and the unit could then proceed to fire on it with a right-click. Once every player unit had finished moving and firing, all enemy units that had been spotted turned invisible again — except aircraft and port artillery, whose fixed positions stayed marked in red — and the computer opponent took its turn under the same rules, its own units invisible to the player until the player's own radar or sonar found them again. Because of this mutual fog of war, a unit firing on the player was identified only by type in the report window, not by position, until the player's next turn located it.
A short worked example: with only two ships in play, the player moves the first ship and it finds no enemy; the player then moves the second ship, which discovers an enemy submarine and opens fire on it. With no units left to move, the turn passes to the computer, which manages its own units the same way, hunting for the (currently invisible) player ships with its own radar and sonar. Once the computer's turn ends, any player ships it discovered become invisible to it again, closing the turn.
Production and Purchasing
Ships and aircraft could be purchased mid-mission from the purchase window, provided the player had enough production points (PP). Production points were earned by destroying enemy units — 25% of a destroyed unit's value in ordinary missions, or 15% in death-match scenarios. Destroying an enemy aircraft carrier valued at 140, for instance, earned 0.25 x 140 = 35 production points. Capturing an enemy port for the first time paid a flat bonus: 15 points for a minor port, 30 for a major port. Losing a unit to enemy fire cost the player 15% of that unit's value in production points.
Some missions restricted what could be purchased: "Factories under attack" blocked all purchases for that mission; "Storm ocean" removed submarines from what could be bought; "Bad airfields on islands" barred aircraft from being based on islands or land; and "Bad weather" removed aircraft and carriers from what could be purchased. A standing restriction applied everywhere — a player who did not control any port could not purchase aircraft at all.
Taking Control of Enemy Ports
A major or minor port switched to friendly control the moment any ship other than a submarine, transport or auxiliary vessel — and any aircraft — moved onto its field. As with combat production points, capturing an enemy port for the first time paid the player 15 production points for a minor port or 30 for a major port.
Rank Ladder
Points earned across missions and campaigns translated into an in-game rank, running from Recruit up to a navy's highest wartime commander. Ranks 1 through 18 were Commission Officer (CO) grades, from Midshipman/Ensign-equivalent up to the five named historical fleet commanders at the very top of each navy's ladder; ranks 19 through 28 were Non-Commission Officer (NCO) grades, covering the enlisted structure below them. Standalone-mission and death-match scores only unlocked ranks from Lieutenant (Junior) down to Recruit; campaign scores could unlock the full ladder, 1CO through 28NCO, including the named admirals at the top. The table below reproduces the full 28-rank ladder for each of the four playable navies; a standalone version of the same table is kept on the BattleFleet rank list, alongside the site's reference pages on the United States Navy, its wartime admirals, the Kriegsmarine's Karl Donitz and Erich Raeder, and the Imperial Japanese Navy's wartime admirals.
| Rank | United States Navy | Kriegsmarine | Royal Navy | Imperial Japanese Navy |
|---|---|---|---|---|
| 1CO | Chester Nimitz | Dr. Erich Raeder | Sir Arthur Cunningham | Isoroku Yamamoto |
| 2CO | Ernest King | Karl Donitz | Sir Bertram Ramsay | Osami Nagano |
| 3CO | William Halsey | Gunther Prien | Sir Dudley Pound | Chuichi Nagumo |
| 4CO | Raymond Spruance | Gunther Lutjens | Sir James Somerville | Takeo Kurita |
| 5CO | Thomas Kinkaid | Otto Schultze | Sir John Tovey | Gunichi Mikawa |
| 6CO | Fleet Admiral | Grossadmiral | Admiral of the Fleet | Joto-Thai (Fleet Admiral) |
| 7CO | Admiral | Admiral | Admiral | Thai-sho (Admiral) |
| 8CO | Vice Admiral | Vizeadmiral | Vice-Admiral | Chu-sho (Vice Admiral) |
| 9CO | Rear Admiral | Konteradmiral | Rear-Admiral | Sho-sho (Rear Admiral) |
| 10CO | Commodore | Kommodore | Commodore | Joto-Thai-sa (Commodore) |
| 11CO | Captain | Kapitan zur See | Captain | Thai-sa (Captain) |
| 12CO | Captain (Junior) | Fregattenkapitan | Captain (Junior) | Nitto-Thai-sa (Junior Captain) |
| 13CO | Commander | Korvettenkapitan | Commander | Chu-sa (Commander) |
| 14CO | Lieutenant Commander | Kapitanleutnant | Lieutenant Commander | Sho-sa (Lieutenant Commander) |
| 15CO | Lieutenant (Senior) | Oberleutnant zur See | Lieutenant (Senior) | Thai-i (Senior Lieutenant) |
| 16CO | Lieutenant (Junior) | Leutnant zur See | Lieutenant (Junior) | Chu-i (Junior Lieutenant) |
| 17CO | Ensign | Oberfahnrich zur See | Sub-Lieutenant | Sho-i (Sub-Lieutenant) |
| 18CO | Midshipman | Fahnrich zur See | Cadet | Heisocho (Midshipman) |
| 19NCO | Chief Warrant Officer | Stabsoberbootsmann | Chief Warrant Officer | Joto-Suiheicho (Chief Warrant Officer) |
| 20NCO | 1st Warrant Officer | Oberbootsmann | 1st Warrant Officer | Itto-Suiheicho (1st Warrant Officer) |
| 21NCO | 2nd Warrant Officer | Stabsbootsmann | 2nd Warrant Officer | Nitto-Suiheicho (2nd Warrant Officer) |
| 22NCO | 3rd Warrant Officer | Bootsmann | 3rd Warrant Officer | Suiheicho (3rd Warrant Officer) |
| 23NCO | Chief Petty Officer | Oberbootsmannsmaat | Chief Petty Officer | Joto-Heiso (Chief Petty Officer) |
| 24NCO | Petty Officer 1st Class | Bootsmannsmaat | Petty Officer | Itto-Heiso (1st Class Petty Officer) |
| 25NCO | Petty Officer 2nd Class | Matrosensobergefreiter | Junior Petty Officer | Nitto-Heiso (2nd Class Petty Officer) |
| 26NCO | Seaman | Matrosenhauptgefreiter | Seaman | Joto-Suihei (Seaman) |
| 27NCO | Seaman Apprentice | Matrosengefreiter | Ordinary Seaman | Itto-Suihei (1st Class Seaman) |
| 28NCO | Recruit | Matrose | Junior Seaman | Nitto-Suihei (2nd Class Seaman) |
Campaigns, Missions and Scenarios
The game shipped with four strategy campaigns, a set of standalone missions and two further categories of scenario — death-match and Free Hunt — for each of the four playable navies.
| Campaign | Navy | Missions |
|---|---|---|
| US Navy Operations | United States Navy | 15 |
| Kriegsmarine (German Campaign) | Kriegsmarine | 10 |
| Royal Navy Campaign | Royal Navy | 10 |
| Imperial Japan Navy Campaign | Imperial Japanese Navy | 7 |
The standalone missions were: Atlantic 1943, Mykonos, Atlantic 1941, Java, Alert, Defence, Sink Cruisers, Long Convoy, Devil Island, Convoy PK30, Ciano's Defense (Italy 1943), Tokio Express, Wolf Pack, Skagerrak, Corvettes, Leutnant zur See, Orange Ports, San Bernardino, Norway Ports, Conquer of Italy, Lamansh, Pacific Race, Emperor Defense, Air Supremacy, South Pacific, Bismarck, Dragoon Carriers, Invasion, Heavy Cruiser, Prince of Wales, Norway Convoy, Azores Transport, Frigate Hunt(s), U-Boats, Grossadmiral, Battleships, Heavy Duty, Drang Nach Ost, Atlantic Island, Torpedo Boats, Sir John Tovey, US Navy Submarines and Patrol Boats. The death-match scenarios were: US Navy I, Kriegsmarine I, Kriegsmarine II, Royal Navy I, Imperial Navy I, Imperial Navy II, Royal Air Force, Antigua, Silent Hunt, B-29 Superfortress, Luftwaffe Hunt and Jamamoto. The Free Hunt scenarios were: Free Hunt Italy, Free Hunt Malaya, Free Hunt Subs, Free Hunt USN, Free Hunt UK, Free Hunt Japan, Free Hunt Germany and Free Hunt Germany 2. The full catalogue of campaigns and scenarios, with sides and objective types, is set out on the campaigns and scenarios page; the version-by-version record of when each mission or scenario was added is on the version history page.
Controls and Interface
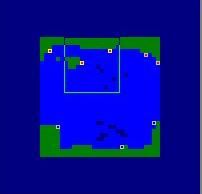
The main combat screen combined four panels: the Combat Map, the Map Window, the Unit Window and the Report Window.
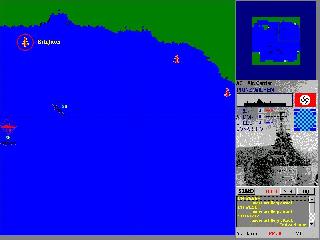
The Combat Map was the grid on which the action took place, sized from 18x18 up to 96x96 fields; blue fields were water, green fields were islands and land, and the map also carried minor and major ports. Enemy units stayed invisible until discovered by radar or sonar, and the player could only fire on a visible enemy unit inside the range of a focused unit. Once the player finished moving every unit, the turn passed to the computer, which moved and fired under the identical visibility rules.
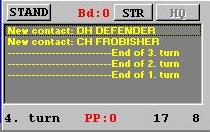
The Report Window carried turn-by-turn messages — new contacts, damage taken, the type of enemy fire received, and the coordinates of destroyed units — alongside the current turn number, the player's remaining production points and the map cursor's coordinates. Four buttons sat above it: Stand (the focused unit makes no move that turn), STR/TAC (switches between the tactical combat map, the default, and a strategic view used only to survey the map — no orders can be given in that mode), HQ (opens the headquarters window) and Repair (available when the focused unit is in port or next to an auxiliary ship). The purchase window described under Production and Purchasing above was reached from this same headquarters screen, and remaining production points were always visible in the Report Window so the player could check affordability before opening it.
Troubleshooting
- Game stops on the first (intro) screen. The program was designed for an 800x600 display at 256 colors. Resolution changes are usually automatic, but on some older operating-system configurations they had to be made by hand — switching the Windows screen resolution to 800x600 at 256 colors before restarting the program.
- Slow screen scrolling in the main tactical window. Typically a symptom of low available memory; saving the game, exiting and restarting the program cleared it.
- Error messages under Windows XP or later with Norton AntiVirus version 8.07.17 or newer. Disabling Norton AntiVirus resolved the conflict for players who ran into it.
Historical Photographs Used in the Game
The black-and-white historical photographs used throughout the game were in the public domain, drawn from the collections of the Department of the Navy's Naval Historical Center (805 Kidder Breese SE, Washington Navy Yard, Washington DC 20374-5060) and the Military Museum Resource, Belgrade. Subjects included Emperor Hirohito aboard the battleship Musashi in 1943; the battleship Tirpitz in 1941 and again in the Alta Fjord, Norway; the battleship Musashi leaving Brunei in 1944; USS Lexington burning during the Battle of the Coral Sea in 1942; the aircraft carrier Shokaku in 1941; the battleship Scharnhorst in 1939; the crew abandoning USS Lexington at Coral Sea; the battleship Bismarck's stern; HMS Repulse leading other capital ships in the 1920s; HMS Hood in the 1930s; Allied leaders aboard HMS Prince of Wales in 1941; HMS Barham, Malaya and Argus; USS Missouri in 1945; Adolf Hitler and others at the launching of the Scharnhorst in 1936; and General Umezu in 1945.
